
this is a VERY VERY basic shading tutorial, and I've tried to keep it
really plain so that paint users can use a lot of the tips in here as
well... more advanced tutorials are in the works, but for the time being
this is just a 'beginners' guide to shading and getting used to the
photoshop environment. this tutorial (and very weird doll) done on niina's
minni base
|
|
before starting:
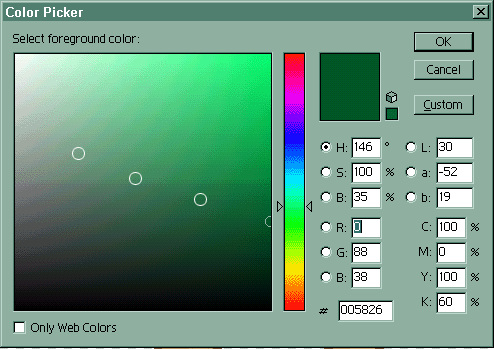
I've been asked exactly what kind of colour palette I use. well,
as rule of thumb I don't use a palette at all. BUT I do however
loosely follow this kind of choice of colours - widening or thinning
my choice as the item of clothing etc needs. this gives me a nice
clean look, which apparently has a 'healthy shine*'
(* ^_~ thanks for the comment and the original question trin )
|
 |
step one: choose your base, and set it up as per my'
preparing a base for editing'
tutorial. then choose the pencil tool and make sure it is on the
smallest (one pixel) brush.
|
 |
step two: on a layer separate to the one the actual base is on,
draw the outline of the item of clthing you want the doll to be
wearing. don't worry if it's a little messy, you can clean it
up later. here I'm choosing to draw a v-neck green vest
|
 |
step three: choose your next lighter colour from the colour paletteand
fill up any gaps in the outline that you may have in your original
outline from where other things cover that part of the gown: ie
here it is where the right arm covers the vest
|
 |
step four: choose the paint can (in photoshop it may be hiding
underneath the gradient toll) and fill the area.
|
 |
step five: choosing the pencil tool once more, go back and clean
up any lines that have doubled up or are 'square' corners. delete
any outside pixels by either using the erase tool or selecting
them with the marquee tool (making sure anti aliasing is off)
and pressing the delete key, as you are on a fresh layer, nothing
you do here will affect the base.
|
 |
step six: starting to shade. choose the next colour from the colour
palette - remember to think about how shiny you want this item
of clothing to look and how dark or light the final item should
turn out. DON'T under any circumstances simply shade from the
outside in, this will make your doll look flat and unrealistic.
the key with even basic two-colour shading is to place the highlights
and shadows approximately where they would be in real life.
grab the magic wand tool, set it tolerance of 5, antialiasing
and contigious off. select the coloured-in portion of the clothing
item. drawing with the pencil tool, think about where the light
is hitting your doll from and the natural curves and shapes of
a person and shade those areas with the lighter tone accordingly.
|
 |
step seven: highlighting. keeping the area selected, select the
next shade of the colour you are using drw in highlights. again
keeping in mind where real higlights appear on the human body.
if in doubt, go look at yourself in a mirror or find a dfirend
and just check out where the light hits their forms to create
light and shadow. don't forget to zoom in and out to check that
you are colouring corretly, sometimes one pixel in the wrong place
can make ALL the difference ...
|
 |
step eight: ... as you can see here ::laughs:: take this opportunity
to fix up any other colours, shades etc, and fix up any pixels
that could be in the wrong place. remember also, that this isn't
teh last you have to do on this item of clothing. you might find
hat yuo're drawing another section and you discover that you can
change this item 'just so' to get it looking even better
|
 |
step nine: adding more detail. life is all about the little details,
and dolling is no different. the more detail you add, the more
well-rounded you end product will be. seams, collars, subtle hints
of shadig, all add to a more realistic-looking and less flat end
product.
|
 |
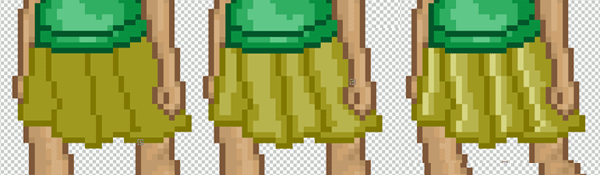
step ten: okay, so I decided that this vest wasn't as GREEN as
I'd like it. so what did I do? brought up my handy hue/saturation
palette (found under image->adjust->hue/saturation) and
dragged the saturation handle up until it was the brighter shade
of green that I was after.
again, this is all on it's own layer so whatever you do here will
not affect anything on any other layer.
so now we have one finished item of clothing...
|
 |
step eleven: make a new layer. you can do this by simply clicking
on the little  button on the bottom of the layers palette. I would also advise
naming each layer as it can get QUITE confusing when you have
10+ layers and are tryig to move them about or trying to keep
track of what item of clothing or accessory is on which layer
button on the bottom of the layers palette. I would also advise
naming each layer as it can get QUITE confusing when you have
10+ layers and are tryig to move them about or trying to keep
track of what item of clothing or accessory is on which layer
you can name the layer by having it highlighted and then clicking
on the little arrow in the top right hand of the layers palette
and choosing layer properties.
|

|
step eleven: from here on out, every item of clothing
follows the same steps that we did for the top. creating each
item of clothing on a new layer, and using the same thoughts that
were in your head when shadng the top...
|

now keep following those steps until you get your finished doll! ::grins::
finish it off properly by using my 'saving
your doll as a gif' tutorial and there you have it, a finished
doll! ;)
|